Last night I was able to get my code to work on my Raspberry Pi. I had a little trouble at first, but then I figure out what I needed to do. In order to get the RXTX api to work on the pi with the program I had to include the RXTXcomm.jar in the build path of the project. This way when I exported it as a runnable jar it would be included in the jar. I'm not sure if this next step was necessary, but I did it anyway. I installed the RXTX api on the RPI using this command "sudo apt-get install librxtx-java".
I also cleaned the primary mirror on my telescope last night. It was very dusty, but luckily didn't have too much stuff that wouldn't come off with just soap and water. I did make a small scratch on the mirror though (I'm not happy with myself for it). My screwdriver slipped a little when I was taking the mirror off of the telescope and made about a 1 inch scratch on the edge. From what I've read, it should be fine, but it will reduce the amount of light I can collect by a small amount. I also had to collminate the telescope when I put it back together. I'm not sure how well it was collminate before, but it should be pretty good now. I'm hoping it is clear tonight so I can test out my work. Hopefully it will make things a lot clearer through my telescope. I will post pictures if I get the chance to take them.
I am going to order some project cases today. I am getting one for the ArduIMU and one for the RPI and two EasyDrivers. Once I get the cases I will start verifying that the ArduIMU is actually giving me good data. I'm expect that to be sometime next week. I'll post the cases I actually get in the parts page once I figure out which ones I'm getting.
I am also starting to work design a GUI for all of this. I have only made a simple drawing on some graph paper so far, but I will post a computer sketch of it when I'm further along. I think I'm going to try to use the WindowBuilder tool found here. I have never used it before, but after a quick google search it is the one I found that is recommended.
Friday, May 17, 2013
Wednesday, May 15, 2013
Component Drawing, a few changes
I have created a drawing of the different components of this project. I used a handy tool at https://www.circuitlab.com/. This is only a rough drawing and the placement of the inputs/outputs on the different components is not accurate. It's just to see how everything will connect together.
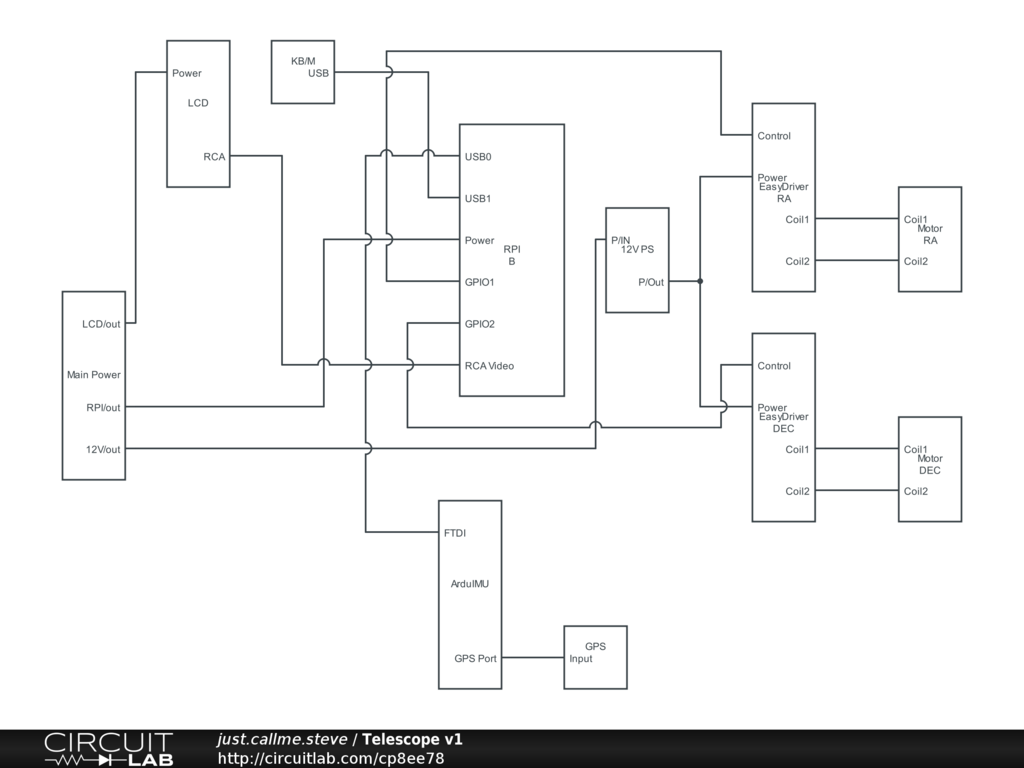
One key change I've made for now is to use the Raspberry Pi model B instead of the model A. This is to avoid problems of attaching the ArduIMU directly to the GPIO pins. The ArduIMU is runs on 5v and the RPI GPIO pins output 3.3v so I would have to get a logic leveler or something to fix this problem. Since I already have a RPI model B (rev 1 though, so it only has 256mb RAM), I decided to take advantage of its extra USB port and not worry about connecting the ArduIMU to the GPIO pins for now. I am also planning on only mounting the ArduIMU on the tube of the telescope so the long FDTI USB cable should work nicely to connect to the RPI anyway.
One key change I've made for now is to use the Raspberry Pi model B instead of the model A. This is to avoid problems of attaching the ArduIMU directly to the GPIO pins. The ArduIMU is runs on 5v and the RPI GPIO pins output 3.3v so I would have to get a logic leveler or something to fix this problem. Since I already have a RPI model B (rev 1 though, so it only has 256mb RAM), I decided to take advantage of its extra USB port and not worry about connecting the ArduIMU to the GPIO pins for now. I am also planning on only mounting the ArduIMU on the tube of the telescope so the long FDTI USB cable should work nicely to connect to the RPI anyway.
Monday, May 13, 2013
Phase I Complete
Success! I am now able to feed live sensor data from my ArduIMU into my java program. Once in the program I can convert the horizontal coordinates given by the Euler angles the ArduIMU calculates into equatorial coordinates that I can use with my telescope. There is only one problem. I have no idea whether or not the readings from my IMU are actually accurate. The only way to test that will be to mount it on my telescope and see if the coordinates match up or not by eyeballing it. To do that I still need to get my program and ArduIMU to work with my Raspberry pi and figure out a way to mount the ArduIMU/Raspberry pi on the telescope so that the ArduIMU is level with the telescope. I have posted all of the code that I have used to calculate the conversion on the code section. If you have any questions let me know.
Conversion 75% complete, PyEphem=out Kstars=in
So after I looked at PyEphem a little harder I realized that it actually doesn't do what I wanted it to do. Because of this I have completely abandon using it. I did find some else that was very useful. Kstars is an open source program (sort of like stellerium) for linux. The reason it caught my attention is because of its astrocalc feature which allows you to convert horizontal coordinates to equatorial coordinates, and this is exactly what I am trying to do. The only thing stopping me from using it's source code directly is that it is written in C++. So I decided to just use it as a guide to write my own java code.
After a nightmare of conversion problems (degrees to radians and radians to degrees or hours) I have finally gotten my program to calculate declination correctly. I am very close to getting the right ascension too. I believe I have fixed all of the conversion issues, but I am getting a null pointer exception when I do local side reel time - local hour angle. Hopefully it is a simple mistake, but I haven't had much time to debug it yet. I should have it fixed by tonight. I will post all of my code under the code tab once I get it working.
Once that is fixed, on to the next step: testing the accuracy of the IMU. At the moment, I have no idea if the IMU is even giving me good horizontal coordinates. I have had to assume they are correct so that I can make sure the math for the conversion is correct. I'll be mounting the ArduIMU to the top of my raspberry pi tin for now. I've tried a temporary electrical tape mount already, but I'll have to figure a better way to do it for testing. Any suggestions on doing this would be very welcome. My ideas right now are hot glue, double sided tape (strongest possible), or maybe even something as simple as a zip tie. I'm hoping to start this testing this weekend, or the next. At some point this week I have to take the primary mirror out of my telescope for cleaning though. It should be fairly easy to do, but if anything goes wrong it could delay this project significantly.
After I confirm that the IMU is actually working correctly, I need to figure out a way to directly connect it to the Raspberry pi using the GPIO. I have to do this for both the ArduIMU because the RPI model A I will be using only has 1 USB port which I plan to use for the keyboard/mouse combo. If power is not as much as concern as I anticipated I might be able to get away with using the RPI model B that I have and just use the FTDI cable I'm currently using, but I would rather use the model A since I kind of bought it specifically for this project. Once I figure out all of that, then the next step will be to start working with the motors. I am thinking I might start by hooking the EasyDrivers up to my Arduino Uno just to figure out how they work a little bit. Then I think I will know what I need to do in order to hook them up to the RPI's GPIO pins. Worst case, I think I can easily figure out how to connect my Arduino Uno to my RPI so I could just use that to control the EasyDrivers, but that would cost a fair amount of power I'm guessing.
Friday, May 10, 2013
PyEphem
As I was thinking about the conversion process that will need to be done, I figured out that I was over thinking it. The angles that my ArduIMU puts out should all give me the coordinates in the horizontal (or altitude-azimuth). This means I only have to do one conversion, from horizontal coordinates to equatorial coordinates. Luckily, I have found equations that allow you to do this easy. As I was searching for those equations though I found something even better.
I found a python library called PyEphem (here is their website). This library actually has a conversion function built in. It also has several other useful tools that I was going to have to create from scratch. The only downside is that it is for python. From what I've read so far I can create some kind of jython interface that will allow java to use the python module. Everyone says it is simple and easy to do so I think I'll give it a try.
The PyEphem site also has some nice links to databases of celestial objects. They don't seem to be too large so I should be able to store at least some of them on the RPI's SD card. Here is where those links are located.
I also found some java libraries that are similar, but no where near as functional as PyEphem. I am thinking this one might be the most useful. It would allow me to do some things inside the java code which could save some needed time when the program is running. I'm planning on working on the project as much as possible this weekend, unless it isn't cloudy. Then I'll be testing out my new camera!
If you have any suggestions or questions, please leave me a comment.
Tuesday, May 7, 2013
First attempt at astrophotography, and getting into the project
After getting into this project a little further, I have decided to first get everything to work with manual control. By that I mean I will be able to read the sensor data to see the position of the telescope, and control the motors manually through the raspberry pi. Once this is complete, then I will start automating the motor control and set up procedures.
I have figured out a few things now. It looks like I am going to have to do two conversions for each line read in by my sensors. Conversion one will be to convert the Euler angles to the Alt/Az coordinates which isn't that hard to calculate. The second conversion will be from the Alt/Az coordinates to Equatorial coordinates which is also fairly straightforward. I am hoping the raspberry pi will be able to do this fast enough it can handle doing it each time a line is read from the sensors.
I am now able to read in the sensor data directly into a java program using the RXTX library. This was a little complicated to setup because I am using a 64 bit version of Ubuntu to program in, but I tried using the latest (not the latest stable) build of it and it works fine. I did have to go into the project properties and remove and then re-add the system JRE to the project in order to solve some problems.
On a side note, this past weekend I tested out my new camera adapter for my telescope (here it is on amazon). It allows you to take pictures through your telescope by mounting your point and shoot camera to the adapter, and then mounting the adapter to your eyepiece. The camera looks through an eyepiece, which isn't ideal. You can see the results of my first try in the pictures section or by clicking here. After taking all of these pictures, I kind a little excited and decided to take it a step further. So I ordered a Canon EOS Rebel T3 DSLR with some accessories that will allow me to directly connect the camera to the telescope without using an eyepiece. This is a much better way to take pictures with your telescope. One of the main concerns I had while doing research for what I would need is that there are issues with telescopes like mine (a Newtonian). Basically, where the eyepieces go is the focal point of the telescope. Now if you replace the eyepiece with a DSLR, the focuser will have to be moved in quite a bit more to be in focus. The problem is that most Newtonians have focusers that cannot go far enough in to compensate for this. I was very lucky with mine as it was made with this in mind. On mine, you can actually remove the part of the focuser where the eyepiece goes, and there is a T-adapter build in to it. The part that was removed is big enough that it allows the scope to be focused when a DSLR is used with it. Check back on the pictures section next week. Hopefully I'll be able to take some pictures with my new camera as long as it's not too cloudy (though I will still try even if I can see just a little part of the sky).
Subscribe to:
Posts (Atom)